Don't bother to click on it. It won't lead you to the actual dio.
Anyway, let's move onto another element. Chapter2, "Fear of the Dark", was considerably bigger. Not only in characters and how many shots were used, but in terms of set and the scale of things. I won't cover everything in today's blog. So today, we'll examine walls, ceiling, lighting and corridor construction.

Building the lobby, it's almost all wood. But doing the corridors, I gave up on that idea. I had bought a bunch of wood pieces. I forget the exact dimensions, but when I cut them in half, it creates a perfect sized floor. (too small for the hanger, but it's what I used as the floor for Overkill's Lab.) If I take those pieces and line them up the long way, it becames a corridor. All you have to do is paint them whatever color you want and you multiple floor pieces.
The next step was to buy a bunch of L-brackets. These would help the walls stand on their own. (Mind you, this is all trial & error). The 1st corridor I built, I screwed in the brackets at the ends. That was a mistake because the foamboard I use for the walls warps after painting. (That would be why Luke Ellison uses paper on his and never paints the actual wall!) In any case, setting the L-brackets in a bit, you support the walls in a different spot.
The walls are made of foamboard. As long as you have a sharp blade, a t-bar and a metal ruler, you are good to go (give or take a pencil and measuring tape). The height and length of the walls are entirely up to you. I cut the length of the walls to equal how long the floor boards were. As for the height, that is dependent on what you need it for. 
Looking at the above shot, you can see that the walls are really tall compared to a 3.75" figure. Frankly, I had a reason for doing that. I use a few figures for height comparisons. To give it a tiny bit of detailing, I added some basswood beams at the bottom. In the end, they were painted Boltgun Metal to offset the grayness of the set. I drew on the walls to make them look like the walls were constructed as panels.
Painting the walls probably wasnt' the best idea but I wanted the corridor sections to be uniform. I went to Lowes and had a couple of different grays made up for me. 1 paint scheme is dark (you'll see that in the lobby) and the other is light (like this one). The foamboard will warp. To keep the walls straighter, I made slight folds on the backside. You can see the creases in the 2nd pic. If you do it gently, you dont' see the folds on the inside, but only the outer.
To stand the walls up, I used masking tape. Good old masking tape. Better than duct tape in these instances because I can cut the tape and break them down. (see 2nd pic) BTW, that's a corner piece you see in the 2nd shot.
The ceiling, while fairly easy, was an absolute headache. You'd think all you have to do is cut out a piece and put it on top of the structure. HA! I cut my ceiling to be slightly bigger than the area it covers. Punch holes thru the top to put in the X-Mas lites and you are good to go. Luke had suggested using masking tape to help block out any residual light filtering in. Cuz face it, the cuts aren't entirely accurate so there are cracks and open areas between joining areas. I ended up putting a towel over the whole thing to block ANY light come in. :D
Now, you can't see it, but 1 of the ceiling sections has basswood beams around the lights. It runs the length of the ceiling. I did that because it would add texture and depth to an otherwise REALLY boring corridor. You MIGHT be able to spot it in Chapter2. If not, it's no biggie. It's just an analistic thing.
With my dio, the corridors are supposed to be dark. I wanted that Doom/Aliens feel. I love how they change up the lighting and there is very little of it. I tried using a row of blue x-mas lites but it was still too dark. I tried red and it wasn't the right color. Yellow. No. Magenta worked best in the end. Shooting the pics was incredibly difficult. If I remove the ceiling panel, light comes in, right? It turns out that the x-mas lites weren't bright enough. So I took extra string and shoved in the lights around the camera or near the figures. When doing the finished shot, I cut the x-mas lite(s) out. And yes, I would literally hold the camera in one hand and the string of lights in the other to get it right.
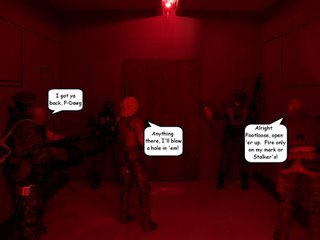
So there you have a finished shot. You can just make out the beams running along the ceiling around the lites. I don't remember the specifics on HOW I did the scene. I most likely have a light or two in my hand, directed toward the crew in the pic. Amazing how something so bland can turn into this!
I have 4 sections; 1 has an elbow.
Long section = 24" x 11.25" x 8"
Short section = 18" x 12" x 8"
(Height varies between 7.5-8")
Until next time.
No comments:
Post a Comment