FEAR OF THE DARK
Part 3
Part1 discussed corridor construction. Part2 discussed the GI Joe team that went in. Today is part3 and I will discuss the construction of The Lobby.
I won't BS anyone here. The Lobby was an absolute headache. I had high hopes for it, but because of my lack of carpentry skills, I can only do so much. Plus, money was tight and I really had to work with what I had. Way back when, our friend Brenna was having a fence built. We ended up with all the 2x4s that were used as guides for the fence posts. So I had a ton of 2x4s sitting around. Plus, my father came up and installed a couple of shelves in a closet. The old shelves, made w/ what seems to be a really lame particle board, were discarded and kept by me.
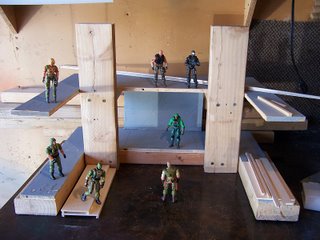
The Lobby is made 90% of wood. This is actually in a pretty early stage. 2x4s make up the support pillars and part of the floor. You can't quite see it, but the 2nd level is sitting on a couple of 2x4s. I drilled 2 2x4s into the back of the support pillars (T-construction).
For the flooring, I used those discarded shelves. I used a dremel and cut a square U shape. Would I like to have done a rounded lobby? Yes, I would have. But like I mentioned, I don't know how. This whole process didn't come all out of my mind. I used the lobby from the movie Doom as my inspiration.

I know, I know, NOT quite the same thing. But I used it for reference. It would be during this particular phase that I started taking test shots to see how things would look when the occupied with figures. It was pretty cool but not finished enough to get a good idea. There was one little element that kept on bothering me. Would it be BIG enough? I would find it months later the answer to that.
Now, if you look hard enough, you can see that Beach Head is standing on something. That was the early stages of the steps/stairs. I bought 2 sets of steps so the Joes could walk right up to the raised floor. You can also see the basswood 'beams' I used for just about everything. Easy to cute, fairly inexpensive and it just adds little details here and there. They would also be used for guard rails. I used the figures to figure out the scale of things. The height of the guard rails, how tall the structure should be, distance between 1st and 2nd floors, etc.
So this is a shot where things are closer to being finished. Beams were added to the pillars to hide the screws. It also added a lil texture and color to an otherwise GRAY set. The stairs are finished with a tiny bit of dry brush to make the steps look a lil worn. I also built (out of basswood) 2 computer consoles. Unfortunately, they aren't working consoles. It would have been really cool to have light coming from them to help illuminate the area. The console downstairs would act as a... Errrrrr... whatever consoles do when you see them in movies.
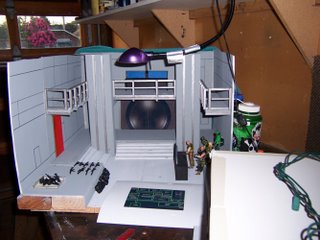
Ok, so other than adding details and stuff, the last things to do were the walls and in theory, a ceiling. Because I wanted to just get Chapter2 done, I skipped the ceiling and skipped on 1 wall panel.
When I was doing the next test shots, I found that the set wasn't big enough. :( I added two more floor sections to make the set longer. If I took a pic of the 'small' set, the viewer could see the edges. Look closely and you can see the guard rail on the right side ends right at the wall, which also is the end of the set. Didn't quite work the way I wanted so using the trusty 2x4s, I created 2 more floor pieces. Foamboard was glued on top then painted gray like the rest of the set. As for the floor, it's the same idea as Overkill's Lab. 2 painted boards.
As for the walls, those were pretty easy, but time-consuming. The longest part of doing this was waiting for the paint to dry. Like the corridors, it's: measure, cut, paint, wait-to-dry, and add detail. Those too warped so there was a lot of bending of the foamboard to try and keep the straight. I added a 2nd door (it's red) just to make the set more interesting. For the most part, the walls are taped on. The backside of the lobby was set up so it's not 1 big wall piece, but several. Masking tape is everywhere, keeping the stuff standing. The left wall is taped on. You can't see a piece of tape that goes from the wall to the left pillar. As for the right side, it's not taped at all. I have 2 water bottles holding it up. The green towel is there to help keep out the light because where the walls meet were NOT cut straight. :(
Just for the record, I'm not into flash photography for the dios. So I try to use natural light when possible or a good old lamp. In this case, ALL that is illuminating the lobby is an overhead halogen clip-on desk lamp. Due to a bit of warping of the actual 2x4s, I had to tape a section to the table! Despite all the lil inaccuracies of the set, most of it can be fixed w/ a lil photo editing.
The final look of the set as seen in the dio? Take a look. Not once do you get to see the whole thing at once. Part of it is director's choice. Part of it has to do with what can be pictured properly w/o seeing all of the set's faults. Hope you enjoyed it!

Until next time...
No comments:
Post a Comment